
How to use AIDeskPro
A guide with real screenshots of the application, from the first login to agents
AIDeskPro has four ways of working, and this page walks through them in the order you usually meet them. All screenshots come from a test account with fictional documents.
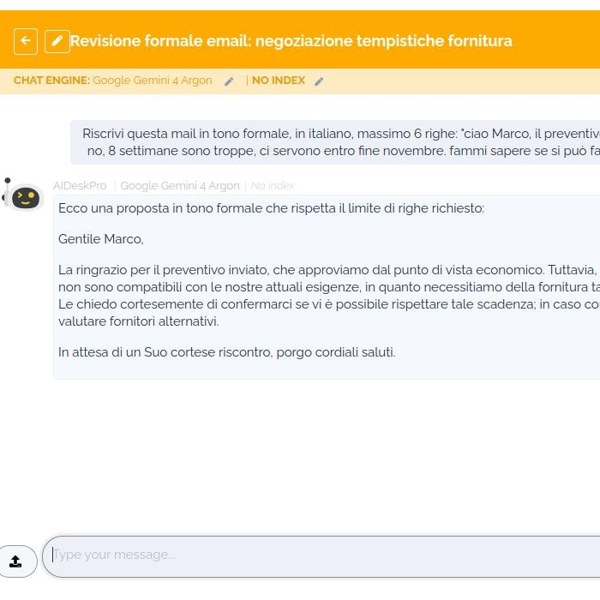
CHAT
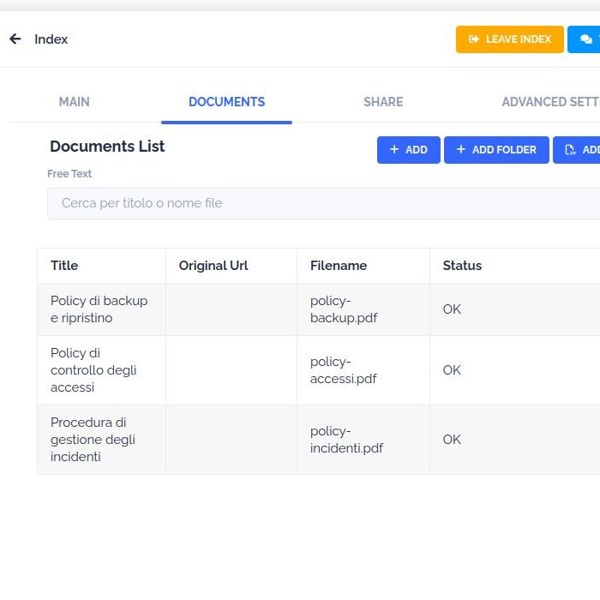
INDEXES
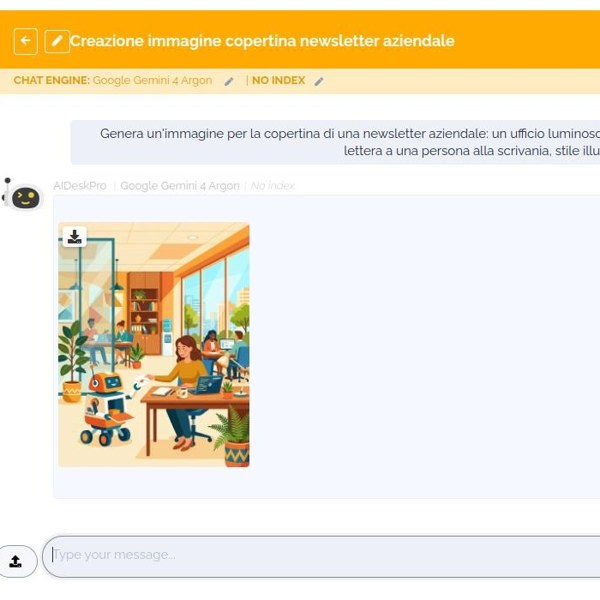
IMAGES
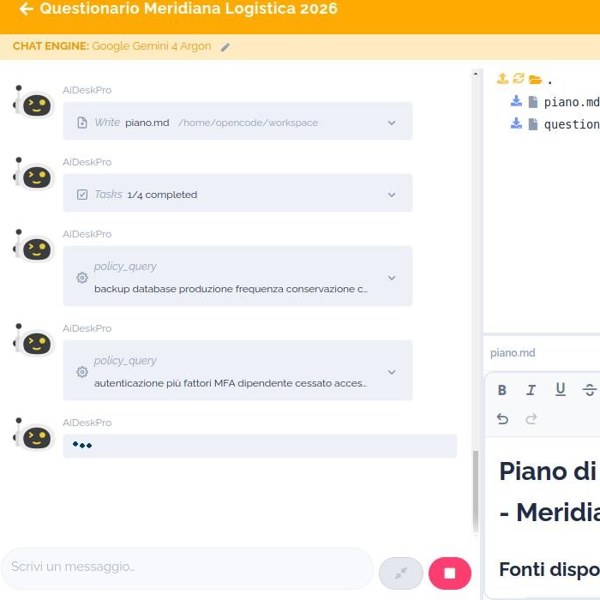
AGENTS
The Chat
After logging in you land on New Chat. Before writing you can decide three things: which model to talk to, on which documents and with which tools. Or just write: the default model answers right away.
Choosing model, index and tools
- In the CHAT ENGINE bar click the pencil to change model. In the dialog you can also tick Set as my default and keep it for future chats.
- Next to it, NO INDEX opens the list of Indexes: pick one or more, and the chat will answer only from those documents.
- The gear icon at the top right opens the tools: Internet for web search, Image generation for images, Documents for attachments.
- The button next to the message box attaches a file or an image to the conversation.
- Every chat gets an automatic title; from the bar you can share it, print it or download it.

A work question
The plain chat is fine for everything that doesn’t need your documents: rewriting an email, translating, summarizing a pasted text, drafting an outline.

With web search
Turn on Internet among the tools and the model searches the web before answering. The answer lists the sources with their links, so you can check where each piece of information comes from.

Diagrams
If you ask for a flowchart, an entity-relationship schema or a sequence diagram, the chat doesn’t give you code back: it draws the diagram on the page. It works well for explaining a process, a data model or a protocol.


Asking questions about an image
With a multimodal model you can attach an image and ask what it contains. Here the legend of a remote control’s buttons exists only in the figure: the model reads it and answers.

Indexes
An Index is a collection of indexed documents, that is, documents made queryable by a chat. It can hold one file or thousands. Our advice is one per topic: company policies, offers, product manuals, a customer’s contracts.

Creating an Index
- From the Indexes menu, click New index.
- Give it a name and choose the type: ExtendedSummary for documents (the recommended one), Composed for an index made of other indexes, Chat if it only holds instructions.
- Save: the Documents, Share, Advanced settings and Metadata tabs appear.

Uploading documents
- In the Documents tab click Add and choose the file. PDF, Office, text, HTML, images and many more formats are accepted; with Add folder or Add ZIP you upload a whole folder.
- The title is proposed from the file name: change it to something readable, it is what the chat will cite as a source.
- Indexing starts by itself. When the status is OK the document can be queried; Update documents refreshes the list.


Sharing
- In the Share tab add the colleagues or groups to share the Index with.
- Choose whether they can only query it (read only) or also add documents.
- Without shares the Index stays private, visible only to you.
Querying the documents
Open a chat, pick the Index from NO INDEX and ask. The answer is built only on the documents, and at the bottom you find Sources: every passage used, with the document, the page and the button to download it.


Generating images
With the Image generation tool on, describe in the chat the image you want: style, subject, colors, format. The image appears in the answer and can be downloaded with the icon at the top left. Images are generated by Nano Banana, the engine integrated in AIDeskPro. To modify an existing image, attach it and describe the change.

Agents
A chat answers; an agent works: it receives a mandate, reads the documents, writes files, checks and delivers a result. In AIDeskPro an agent is defined once as a Configuration and used as often as needed as an Execution. Whoever writes the Configuration knows the process; whoever launches the Execution only needs to know what they want to get.
The example in this guide is an agent that fills in the security questionnaires customers send to their suppliers, using the company policies as its source.
The Configuration
- From Agents → Configurations click New agent configuration.
- Give it a name, a description and write the System prompt: who the agent is, which resources it uses, in which phases it works, what it must never do.
- Save. The Integrated functionalities (web search, images), Files (files always available in the workspace, for example a template), Resources and Outputs sections appear.


Resources
- In Resources click Add and choose the type: Index (documents), Sub Agent (another agent), Database (via MCP JDBC) or External (an MCP server).
- Give the slot a name and a description: the prompt refers to it by name, here policy and risposte-precedenti.
- Set now fixes the resource in the Configuration, the same for everyone; Request at execution lets whoever launches choose it.
- Required: without that resource the agent doesn’t start.
The Execution
- From the Configuration click New execution, or from Agents → Executions click New agent execution and pick the Configuration.
- Write the title and the starting command: the mandate, as you would give it to a colleague. Choose the model.
- Save: for each Request at execution slot choose the Index with Select. The warning triangle marks required slots still empty.
- In Files you can upload the documents of the case. Then Start.


The Console
As soon as it starts, the Execution shows the Stop and Console buttons. The Console is where you follow the work: on the left the conversation with the agent, on the right the Workspace files with a preview. A well-written agent, when something is missing, asks before starting, with a closed question.


Following, stopping, resuming
- Upload files to the Workspace with the icon at the top right of the Console; the agent sees them immediately.
- Answer the agent’s questions from the conversation, as in a chat.
- Stop halts the execution, Resume picks it up where it was: useful to fix a wrong index without starting over.
- The files produced stay in the Workspace: open them, correct them, download them. No result leaves the company without a person deciding it.
For administrators
Two pages users don’t see, but that decide what AI is allowed to do in the company.

Model Access
- Every model has a visibility: public for everyone, or restricted to user groups.
- Models with an endpoint outside the European Union are labeled No EU: they are used only when someone deliberately picks them, never as defaults.
- Groups are managed in UserGroups; users come from the company single sign-on.
Cost dashboard
- Dashboards shows daily costs, tokens per model and spending per user label.
- Pick the period and the user group to see who uses what.
- A cost that suddenly rises is often the first sign of anomalous use: thresholds and alerts are there to see it before the invoice.
